House number mounting hardware refers to the fastening systems, brackets, standoffs, and concealed studs used to secure address numerals to a home's exterior surface. Selecting the right type determines how long the installation lasts, how it looks from the street, and whether it meets local code requirements.
This guide covers hardware types and materials, surface-specific and climate-driven selection, step-by-step installation, code compliance and visibility, and how Modern House Numbers supports the process from start to finish.
Surface mounts, standoffs, floating mounts, and concealed systems each produce a different visual result and require different fastening approaches. The most durable outdoor materials include 316 stainless steel, corrosion-resistant aluminum, and powder-coated finishes rated for long-term UV and weather exposure.
Choosing hardware for brick, stucco, wood, or vinyl siding demands surface-matched fastening methods. Climate plays an equally important role, as coastal salt spray, freeze-thaw cycling in cold regions, and intense UV in desert climates each degrade different materials at different rates.
Installation follows a clear sequence: surface preparation, accurate layout using a drilling template, the correct drill bit for the wall material, and proper anchor selection. Skipping any step is the most direct path to crooked numbers or failed mounts.
Code compliance requires knowing your municipality's minimum character height, contrast requirements, and setback formulas. Photoluminescent and solar-powered mounting options extend visibility into the night without a power source, which directly affects emergency response times.
Modern House Numbers provides personalized drilling templates and step-by-step instructions with every order, giving DIY installers the precision support needed for a professional result.
What Are the Main Types of Mounting Hardware for House Numbers?
The main types of mounting hardware for house numbers are surface mounts, standoffs, floating mounts, and concealed systems. Each option differs in installation method, aesthetic outcome, and durability. The sections below cover how these types compare, which materials last longest outdoors, and the trade-offs between concealed and exposed hardware.
How Do Surface Mounts, Standoffs, and Floating Mounts Differ?
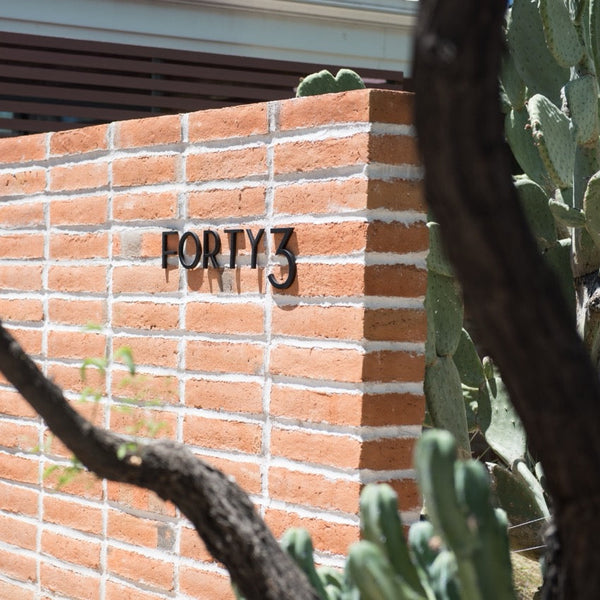
Surface mounts, standoffs, and floating mounts differ in how they position a number against the wall. Surface mounts attach numbers flush against the exterior, creating a flat, low-profile look. Standoffs, such as nylon versions, support numbers approximately 1/2 inch above the mounting surface, adding subtle depth. Floating mounts use concealed hardware to push numbers further from the wall, producing a contemporary three-dimensional effect that significantly enhances street appeal. For homeowners prioritizing modern curb appeal, floating mounts are the strongest choice because the shadow line they create adds architectural dimension no flush mount can replicate.
Which Mounting Hardware Materials Are Most Durable Outdoors?
The most durable outdoor mounting hardware materials are 316 stainless steel, aluminum, and powder-coated finishes. Aluminum forms a self-healing aluminum oxide layer that prevents further oxidation, making it naturally corrosion-resistant without coatings. For coastal environments, 316 stainless steel adds molybdenum, which resists chloride-driven corrosion. In cold climates, material selection is especially important: according to ResearchGate, cyclic freeze-thaw cycles negatively affect the compressive strength of masonry like brick and mortar, which can compromise the bond of mounted hardware over time. Powder-coated aluminum, meeting AAMA 2604 standards, withstands UV exposure for many years without fading.
What Are the Pros and Cons of Concealed vs. Exposed Mounting?

Concealed and exposed mounting each offer distinct advantages and limitations. Concealed hardware, which typically uses 2-inch steel studs and 1/2-inch aluminum spacers, creates a clean floating effect with no visible fasteners, delivering a professional, architectural finish. Keyhole-style concealed brackets also allow numbers to sit slightly away from the wall while making repositioning straightforward. Exposed mounting is simpler to install and easier to inspect for damage, but visible screws can detract from a refined exterior look. For design-conscious homeowners, concealed hardware is the better long-term investment because it protects fasteners from direct weather exposure while keeping the facade uncluttered.
How Do You Choose the Right Mounting Hardware for Different House Exteriors?
Choosing the right mounting hardware depends on your exterior surface type, local climate conditions, and home architectural style. The sections below cover surface-specific mounting recommendations, weather-driven material considerations, and hardware options suited to modern home designs.
Which Mounting Types Work Best for Brick, Stucco, Wood, or Siding?
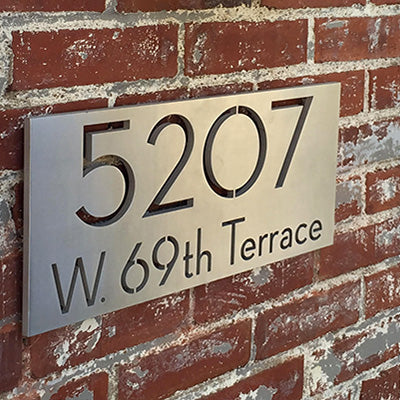
The mounting types that work best vary by exterior material, and each surface demands a specific fastening approach. For brick and stone, drilling into mortar joints and inserting plastic or lead anchors before driving screws provides a secure hold without cracking the masonry face. Stucco accepts screw-mount hardware well but requires pilot holes and weather-resistant anchors to prevent moisture infiltration. Wood and composite siding are the most forgiving surfaces, supporting standard screws, standoffs, or keyhole mounts without specialty tools. Vinyl siding typically requires snap-in or surface-mounted brackets that distribute load without cracking the panel. Matching the mounting method to the surface prevents premature hardware failure and keeps the installation looking clean for years.
How Do Climate and Weather Affect Mounting Hardware Selection?
Climate and weather affect mounting hardware selection by accelerating material degradation through corrosion, UV exposure, and freeze-thaw cycling. In coastal environments, salt spray and high humidity significantly accelerate the deterioration of metallic hardware, making marine-grade materials essential. Inland climates with harsh winters present a different challenge: freeze-thaw cycles can weaken mortar joints in brick and masonry walls, loosening anchored hardware over time. For UV-intensive climates like the desert Southwest, powder-coated aluminum finishes rated to AAMA 2604 standards resist fading without structural degradation. Quality outdoor mounting hardware should support both horizontal and vertical orientation across varying weather conditions. Selecting climate-appropriate materials from the outset is the single most effective way to avoid premature replacement.
Are There Mounting Hardware Options Recommended for Modern-Style Homes?
There are mounting hardware options specifically well-suited to modern-style homes, with floating mounts and concealed hardware being the top choices. Floating mounts create a three-dimensional, shadow-casting effect that complements clean architectural lines, while concealed hardware keeps the facade uncluttered and visually sharp. Matte black finishes have become the dominant preference in 2026 for modern exterior design, offering stronger visual contrast against light-colored stucco, concrete, and fiber cement siding. Oversized numbers with bold fonts align with current modern house number trends, which also favor letters over numerals in some applications. Matching the hardware finish to door hardware, light fixtures, and other exterior metal accents reinforces a cohesive architectural identity and elevates overall curb appeal.
What Are the Step-by-Step Instructions to Install House Numbers with Mounting Hardware?
The step-by-step instructions to install house numbers with mounting hardware cover surface preparation, required tools, common mistakes, and safe removal. Each stage builds on the last, so following the sequence correctly ensures a secure, professional result.
How Do You Prepare the Surface for Installation?
Surface preparation for installation begins with cleaning the mounting area thoroughly to remove dirt, grease, and loose paint that would weaken adhesion or anchor grip. Mark your number positions using a level and pencil, then use the personalized drilling template included with your order to pinpoint hole locations precisely. On brick or stone, plan to drill into mortar joints rather than the face of the masonry, then insert plastic or lead anchors before driving screws to ensure a solid hold.
What Tools and Supplies Are Required for a Secure Mount?
The tools and supplies required for a secure mount depend primarily on your wall material. For most surfaces, you will need:
-
A power drill with standard twist bits for wood or drywall
-
A hammer drill with a 3/16-inch carbide-tipped bit for concrete, stone, or masonry
-
A level and pencil for accurate layout
-
Plastic or lead wall anchors for masonry surfaces
-
The mounting studs and hardware included with your house numbers
-
A rubber mallet for a solid hold
Using the correct drill bit for your surface is the single factor most likely to determine whether the mount holds long-term.
What Are Common Mistakes to Avoid During Installation?

Common mistakes to avoid during installation include skipping the level check, drilling freehand without a template, and using standard bits on masonry. Drilling directly into brick face rather than mortar joints is a frequent error that results in cracked masonry and poor anchor grip. Over-tightening screws can strip anchors or crack softer surfaces like stucco. Rushing past the layout step often leads to crooked numbers that require patching and reinstallation.
How Do You Safely Remove or Update House Number Mounting Hardware?
Safely removing or updating house number mounting hardware requires backing out screws carefully with a screwdriver rather than prying, which risks surface damage. If anchors are set in masonry, use needle-nose pliers to extract them or tap them inward and patch with exterior-grade filler. Clean the wall surface before installing replacement hardware to ensure the new anchors seat correctly in undamaged material.
How Can You Ensure Your House Numbers Are Code Compliant and Highly Visible?
Ensuring code compliance and high visibility requires understanding local size regulations, strategic placement, and the right hardware options. The following sections cover local codes, best placement practices, and illuminated or reflective mounting solutions.
What Local Regulations or Codes Might Affect Mounting Hardware Choices?
Local regulations that affect mounting hardware choices include minimum character size requirements, setback-based height formulas, and material finish standards. The Chicago municipal code, for example, requires residential house numbers to be at least three inches in length, while commercial properties require a minimum of six inches. The Los Angeles Fire Department uses a setback-distance formula: numerals must be 2 inches taller than 1/10 of the setback in feet, meaning a 30-foot setback requires 5-inch numbers. The International Building Code sets a baseline of 4-inch minimum height for residential addresses.
These requirements directly influence hardware choices: taller numerals need sturdier standoffs or mounting plates, and certain finishes must provide sufficient contrast for legibility. Checking your municipality's specific code before selecting mounting hardware is the single most important step you can take.
What Are the Best Practices for Placement and Visibility in 2026?
The best practices for placement and visibility include mounting numbers at eye level, ensuring contrast against the background surface, and positioning them where they remain unobstructed from the street. According to emergency response data, missing or poorly visible house numbers delay first responders, with rural response times already exceeding 14 minutes in some areas. Every second of search time compounds that risk.
Key placement guidelines for 2026 include:
-
Height: Mount numbers between 48 and 60 inches from ground level where possible.
-
Contrast: Use light characters on dark backgrounds or dark characters on light backgrounds.
-
Clearance: Keep numbers free from obstructions such as overgrown shrubs, decorative trim, or porch fixtures.
-
Street sightlines: Angle or position numbers to remain readable from both directions of approach.
-
Supplemental placement: Add curb numbers or mailbox decals as secondary identifiers.
How Do Reflective or Illuminated Mounting Hardware Options Work?
Reflective and illuminated mounting hardware options work by either passively storing and releasing light or actively generating it through LED or solar power. High-performance photoluminescent pigments require no power source; they absorb ambient light during the day and release it as a visible glow after dark, remaining visible for several hours after dusk. Solar-powered house number systems released in 2026 use built-in photovoltaic panels to illuminate LED-backlit numerals at night, with installation options including both adhesive and screw mounting. For maximum daytime visibility, outdoor LED displays typically require 5,000 to 10,000 nits of brightness to remain legible in direct sunlight.
Photoluminescent options are a particularly smart choice for low-maintenance installs where running power to the sign is impractical.
How Should You Approach House Number Mounting Hardware and Installation with Modern House Numbers' Personalized Support?

You should approach house number mounting hardware and installation by combining the right hardware type with expert guidance. Modern House Numbers supports this process through personalized drilling templates, step-by-step instructions, and responsive customer service.
Can Modern House Numbers' Installation Templates and Customer Support Help With Your Project?
Yes, Modern House Numbers' installation templates and customer support can help with your project. Every purchase includes a free personalized drilling template and step-by-step installation instructions, removing the guesswork from concealed hardware placement and surface preparation.
This matters increasingly in 2026. According to Technavio, the US DIY home improvement market is projected to grow by USD 57.13 billion from 2025 to 2030, driven by homeowners taking on more projects independently. Modern House Numbers' templates are designed precisely for that audience: confident enough to install, but wanting professional results.
The global home renovation market is projected to reach $2,111.14 billion in 2026, reflecting how seriously homeowners are investing in their properties. For a project as visible and safety-critical as house numbers, having accurate installation support is not optional; it is foundational.
What Are the Key Takeaways About House Number Mounting Hardware Types and Installation in 2026?
The key takeaways about house number mounting hardware types and installation in 2026 are centered on hardware selection, compliance, visibility, and finish trends working together.
-
Choose hardware by surface: Concealed studs and standoffs suit smooth walls; anchored screws into mortar joints suit brick and stone.
-
Match material to climate: Coastal and high-humidity environments demand corrosion-resistant materials; inland climates offer more flexibility.
-
Meet code minimums: Residential address numbers require at minimum 4 inches in height under the International Building Code; local codes may require more.
-
Prioritize night visibility: Photoluminescent and solar-powered options provide passive, power-free illumination for emergency identification.
-
Follow 2026 finish trends: Matte black exterior hardware is increasingly preferred over traditional stainless steel for its appeal in modern outdoor design.
-
Use provided templates: Personalized drilling templates eliminate misalignment, the most common DIY installation error.
Modern House Numbers combines architect-designed products with included hardware and precise installation support, making it one of the most complete solutions for homeowners who want professional curb appeal without hiring a contractor.